Attending An Event
Account Settings
Billing and Payment
Account Settings
Delete Your Account
Link Facebook or Google
ID or Passport Number Not Valid
Edit Details on Your Profile
Privacy and Security
Tickets
Cashless
Howler Active
Organising An Event
Getting Started
Video Tutorial - Getting Started
Organiser Approval Process
Getting Started with Howler
Our Services
Getting Paid
Howler Customer Support
Payment Gateway Options - For organisers
Manage your account
Setup your event
How to create an event
How to Make My Event Searchable on Howler.co.za
Event Look and Feel
Ticket Type Settings
How to enable donations for your event
Express Checkin
Enable Ticket Resale for your Event
Marketing Tools
Ticket Reps
How to drive ticket sales
Ticket Bundles and Specials
Issue Complimentary Tickets
Custom Ticket Type Links
Marketing Tools - Sending an email campaign
Marketing Tools - Sending an SMS campaign
Setting Up Google Analytics Tracking
Integrating the Facebook Pixel
Howler Brand/CI/Style Guide
Embedded links
Create a QR code linking to your ticketing page
Sponsor Assigning Complimentary Tickets
Event Customisation
Event Page Customisation within the organiser portal
Premium Event Customisation
How to Optimize an Image
Going Cashless
Going Cashless with Howler
Howler RFID Wristband Design Template
Vendor fees - For organisers
Cashless Sales Reports
How to drive Online Topups for a Cashless event.
Cashless Customer Journey
Ticket Scanning
Reporting
Event Protect
Howler Backend - Active Admin
Howler Backend Active Admin
Howler Backend Active Admin - Manage Organiser Roles
Howler Backend Active Admin - Reps
Howler Backend Active Admin - GTM configuration
Howler Backend Active Admin - Create Ticket Types
Howler Backend Active Admin - Promo Codes
Howler Backend Active Admin - Create a Pre Registration Event
Howler Backend Active Admin - Unique Registration
Howler Backend Active Admin - Data Capture
Streaming Online Events
How to create an Online Streaming Event
How to enable Express Check-in for your event
Finding your stream URL
How to schedule a Facebook Live video stream - Using your computer
How to start a Facebook Live video stream - Using your mobile device
How to setup a private Zoom web conference
Pulse
Dashboard Guide 1.1. Ticketing Overview YoY Analysis
Dashboard Guide 1.2. Daily Sales Dashboard
Dashboard Guide 1.3. Ticket Type YoY Analysis
Dashboard Guide 1.4. Price YoY Analysis
Dashboard Guide 1.5. Payment YoY Analysis
Dashboard Guide 4. Audience YoY Analysis
Dashboard Guide 5. Abandoned Cart
Dashboard Guide 6.1.1. Event Sales Overview
Dashboard Guide 6.1.3. Bar Sales
Dashboard Guide 6.1.5. Event Sales Demographics
Dashboard Guide 6.3.1. Total Topups Overview YoY Analysis
Dashboard Guide 6.3.4. Total Topup Ticket Type YoY Analysis
Dashboard Guide 6.3.5. Total Topup Demographic
Dashboard Guide 6.1.4. Vendor Sales
Dashboard Guide 6.2. Cashless Check-Ins Dashboard
Dashboard Guide 6.1.6 Event Sales Ticket Type Analysis
Dashboard Guide 6.3.3. Onsite Topups YoY Analysis
Dashboard Guide 6.3.2. Online Topups YoY Analysis
Vendor at an event
Setting Up Your Vendor Account
Setting Up For An Event
Setting Up Your Menu
Editing Vendor Bank Details
How to use the Howler Cashless Point of Sales Devices - Training Video
Vendor Fees
Vendor Settlement
The Vendor Agreement
Vendor Sales Reports
Legal
Partners Resources
- All Categories
- Organising An Event
- Marketing Tools
- Setting Up Google Analytics Tracking
Setting Up Google Analytics Tracking
 Updated
by Robyn Marais
Updated
by Robyn Marais
Setting Up Tracking
If you'd like to use Google Analytics to track traffic on your ticketing page, you'll need to setup a Google Tag on Google Tag Manager that can be added to the event page to start tracking.
To setup a GA4 Property and link to to GTM to tag, follow the steps in this Google Resource. Once you've done this, you can send your GTM code to clientsupport@howler.co.za to apply this to your ticketing page.
This help doc outlines step by step instructions on how to set up this tag and link it to your Google Analytics Dashboard.
- Set up a Google Analytics account on analytics.google.com
- What would you like to track: Website
Website URL: https://custom_subdomain.howler.co.za or https://www.howler.co.za
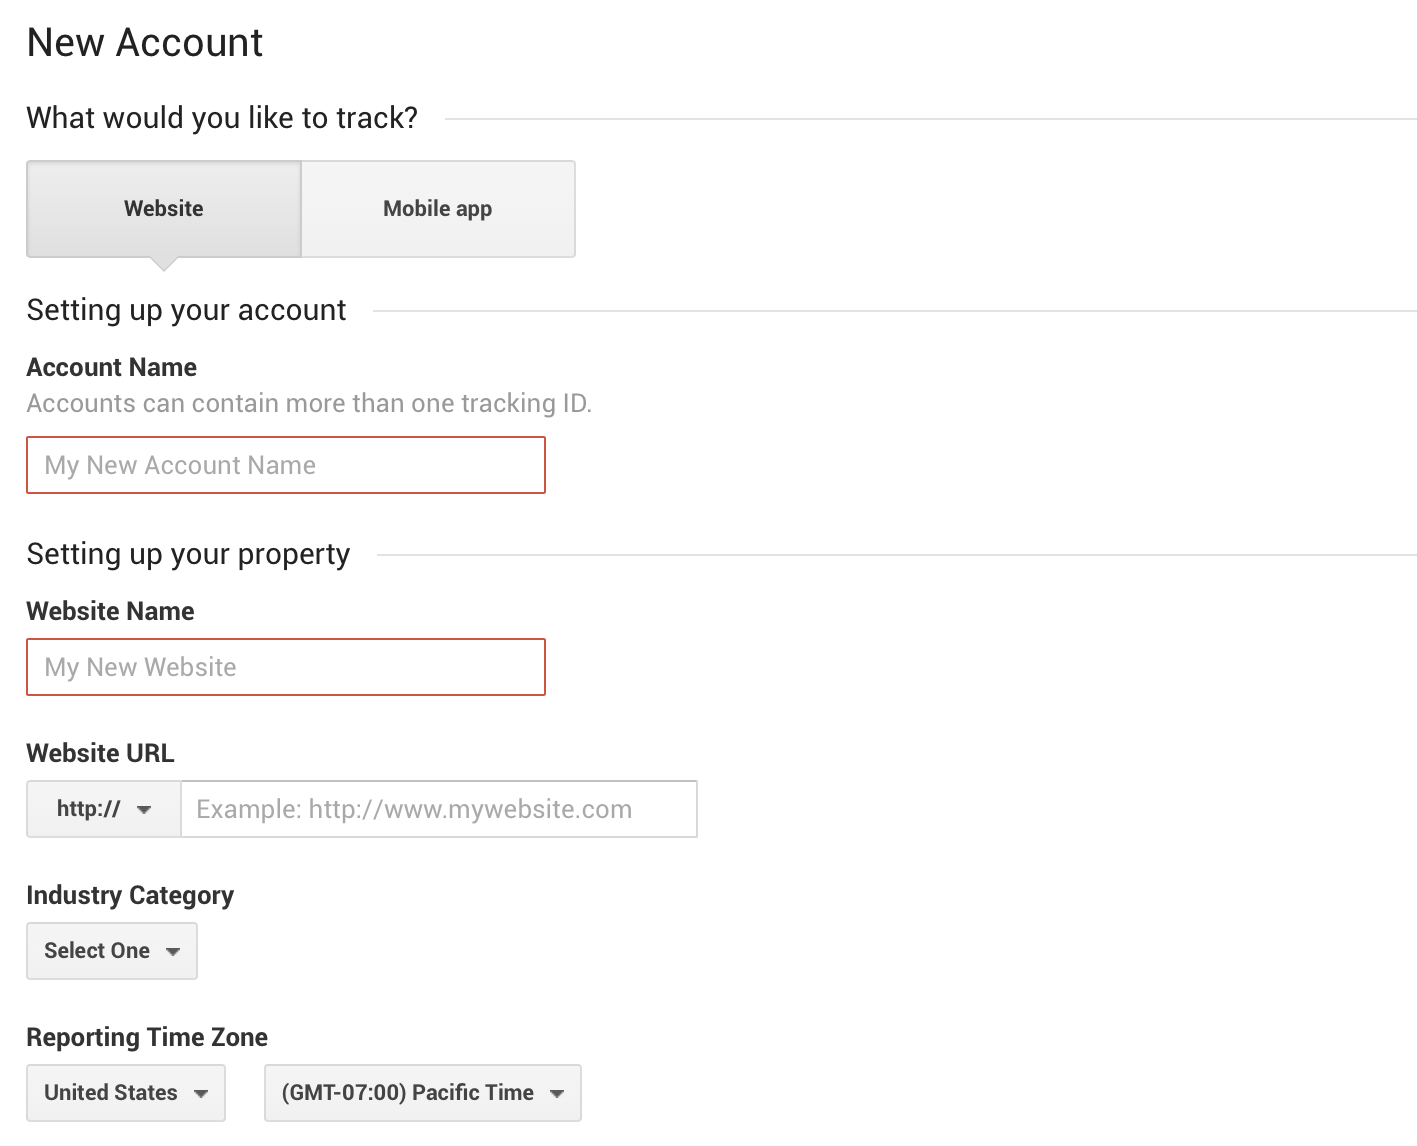
- Copy the tracking ID
- Visit tagmanager.google.com
- Create a new container
- Container name: Organiser name
Where to use container: Web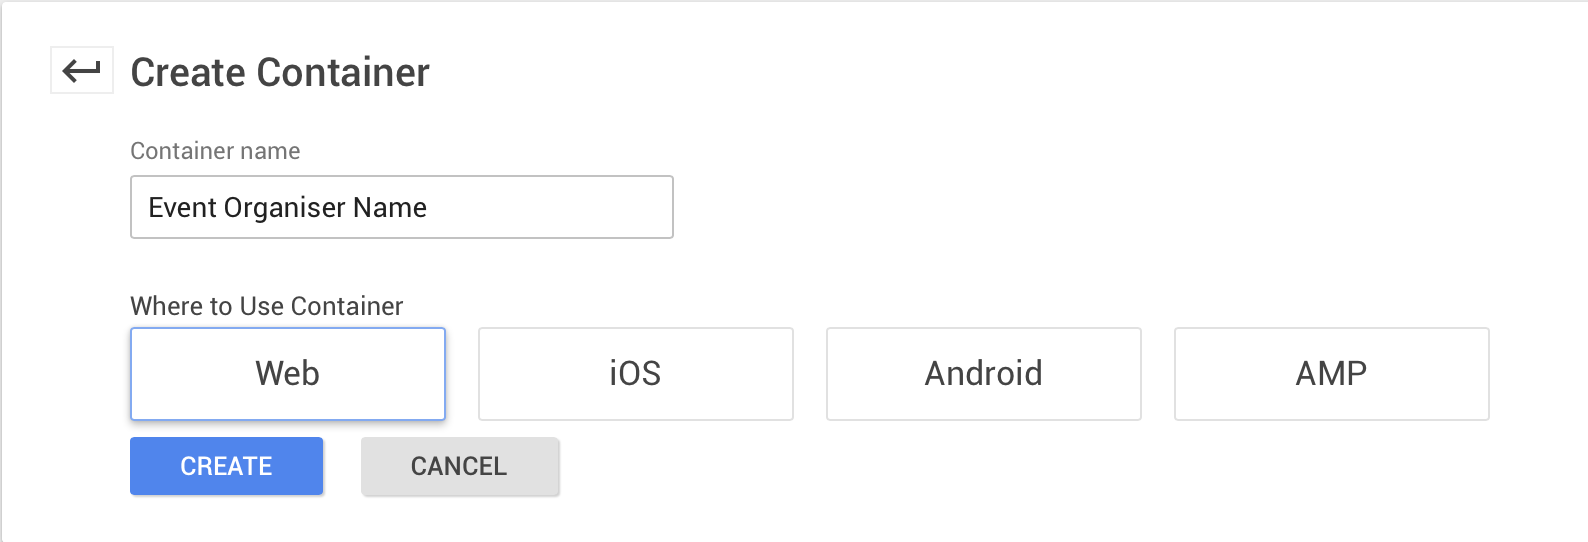
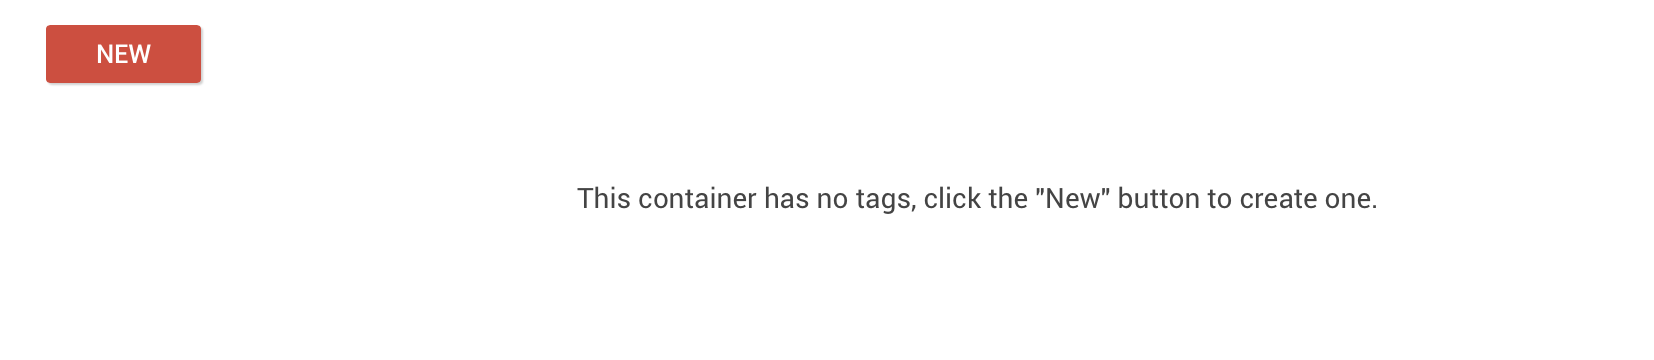
- On the left sidebar, click "Tags"
- Click "New" to create a new tag
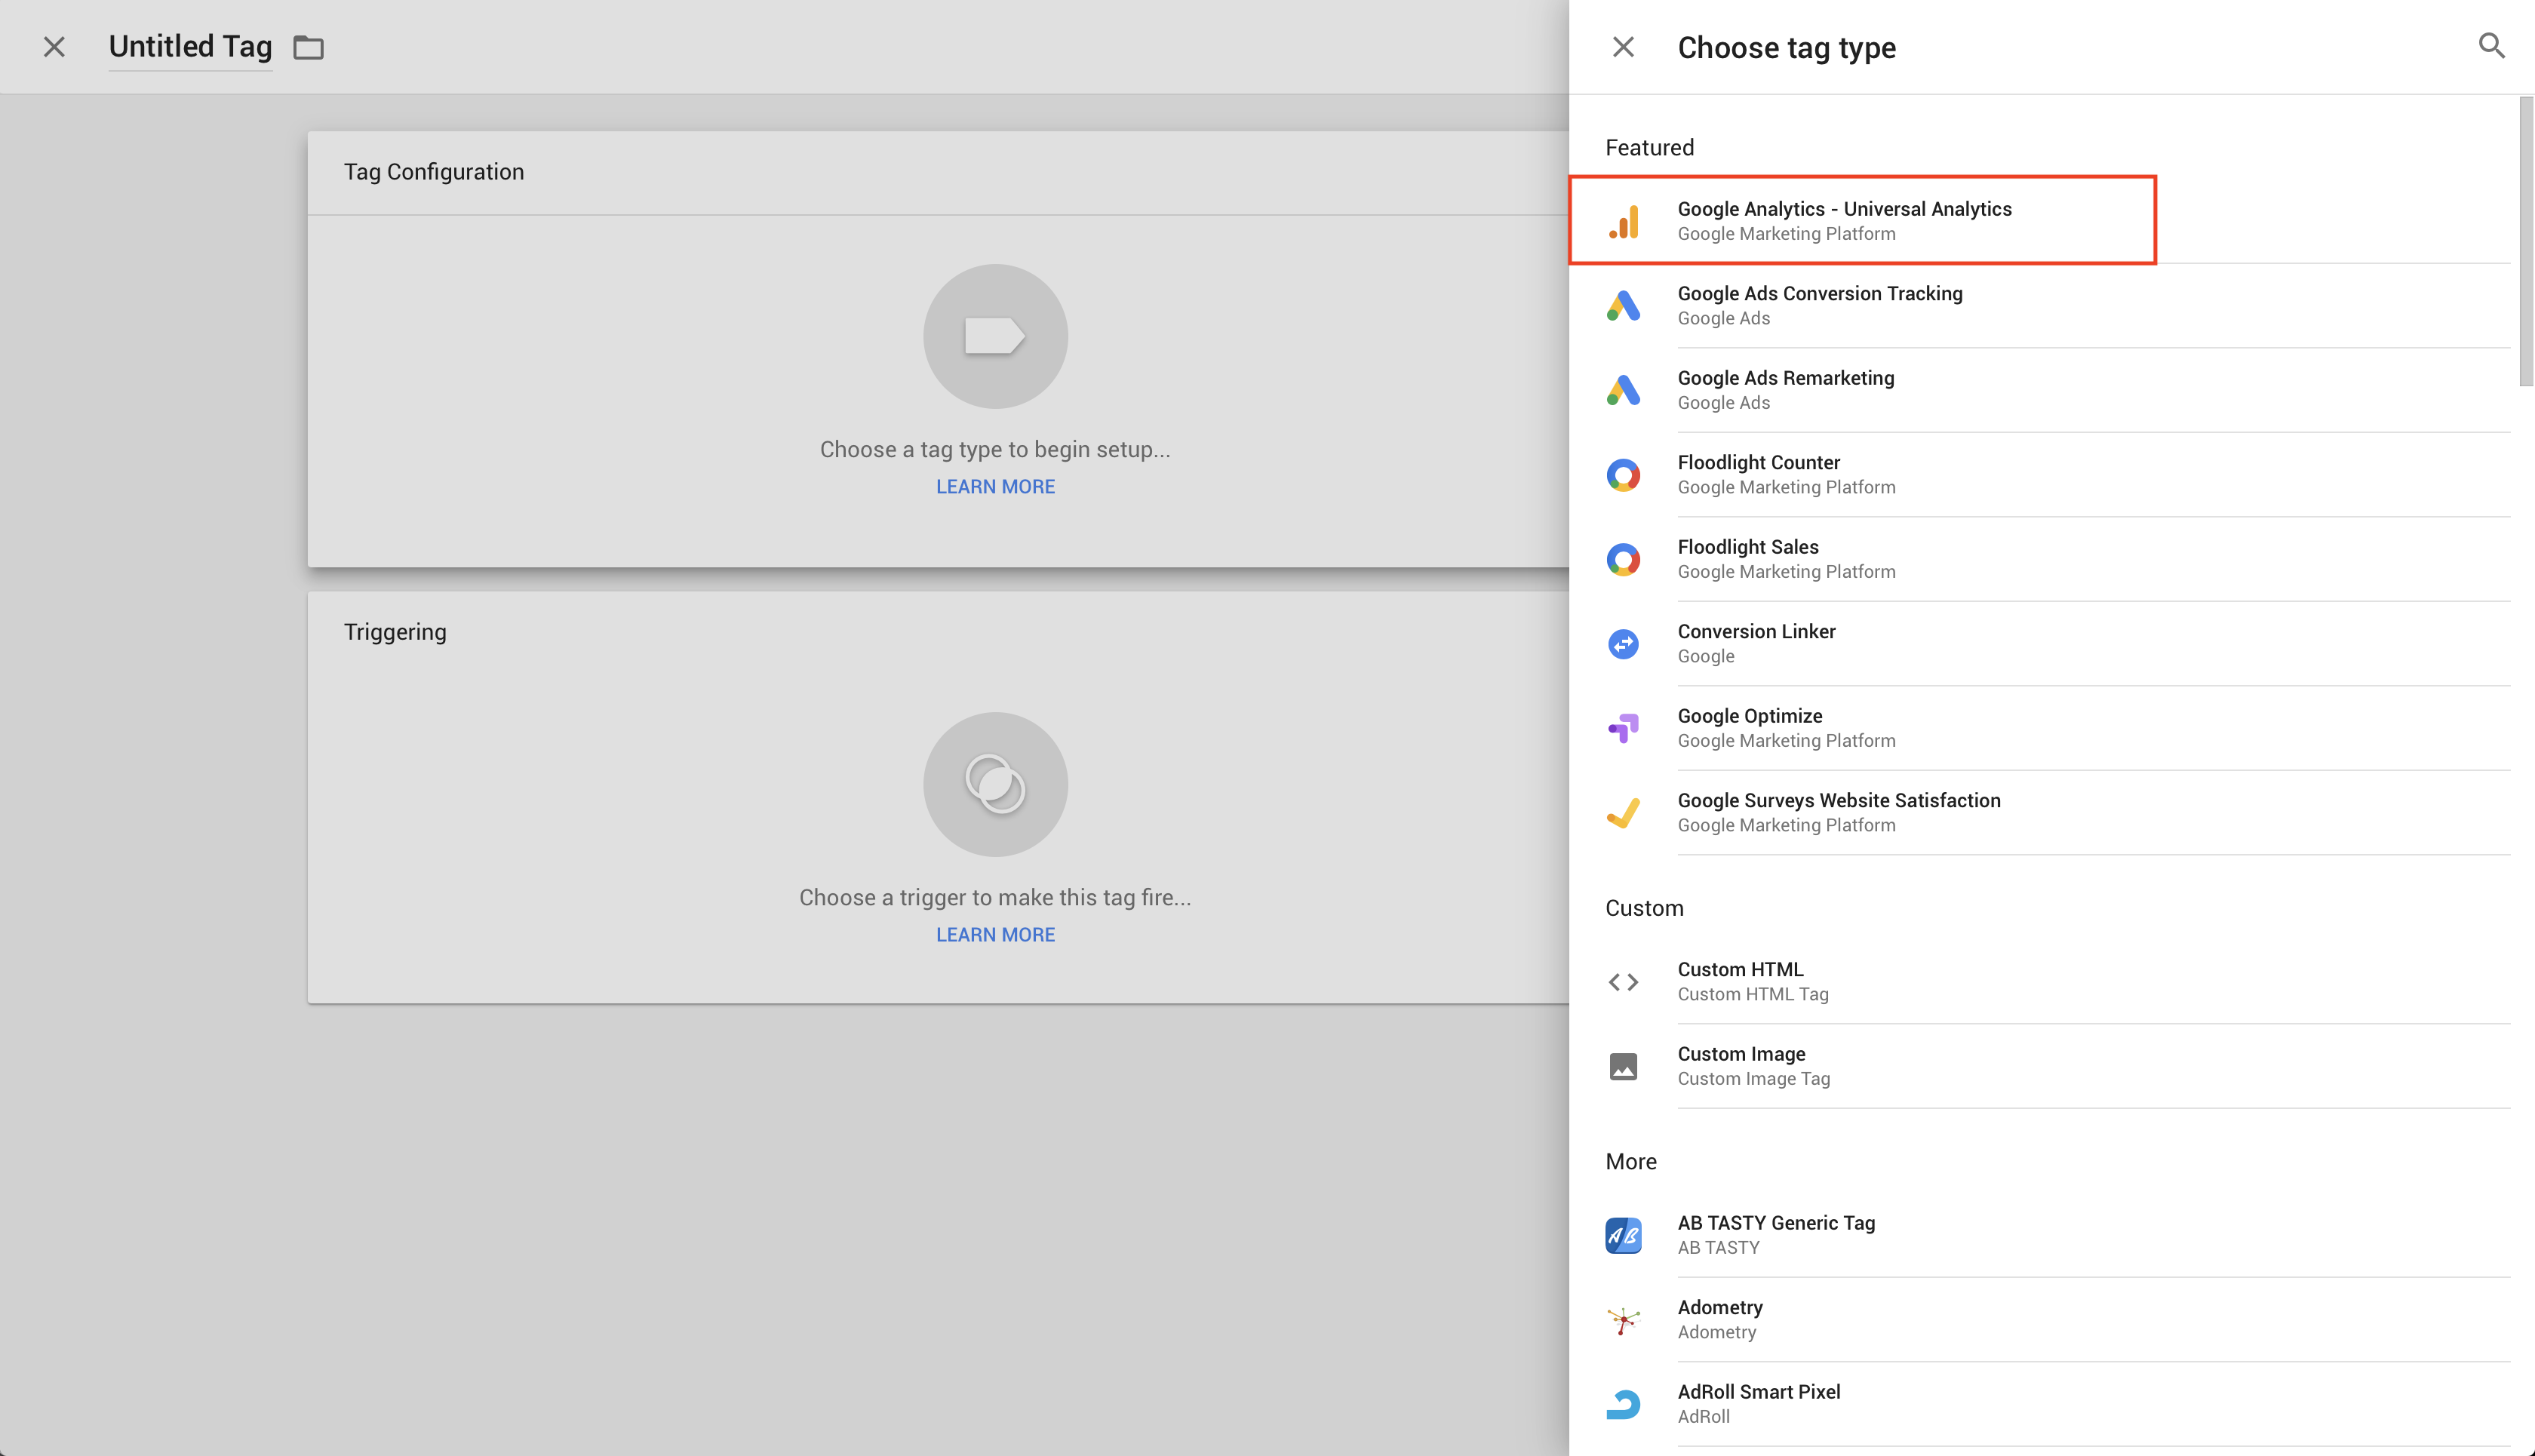
- Click in the "Tag Configuration" box to select the tag type
- Select the "Google Analytics - Universal Analytics" tag type
- Select the Track Type: "Page View"
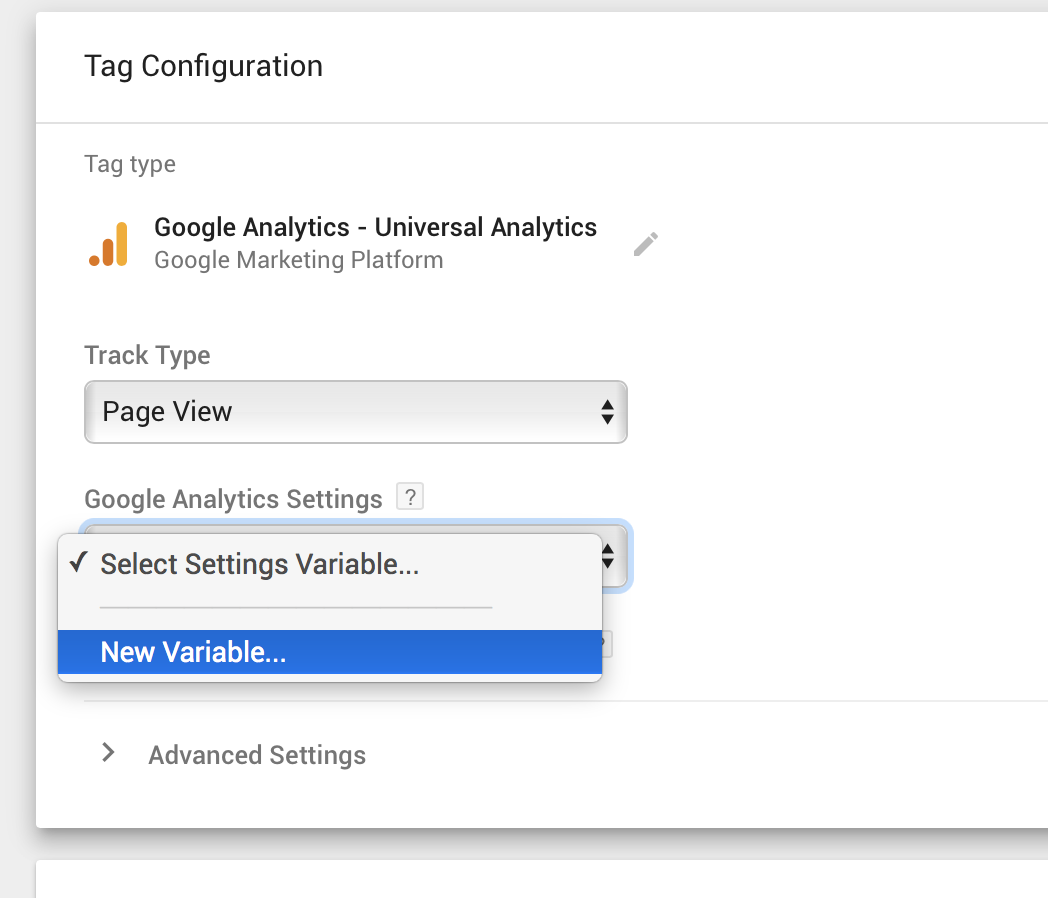
- For the "Google Analytics Setting", select "New Variable..." from the dropdown options
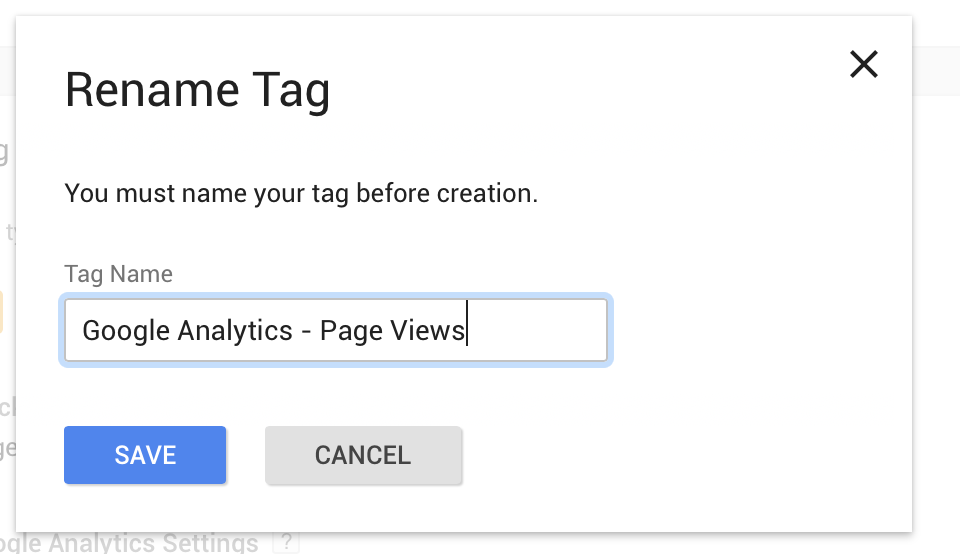
- Name the tag: "Google Analytics - Page Views"
- Save the Tag Configuration
- Create a variable
- Select the "Google Analytics Settings variable type
- Enter your Google Analytics tracking ID and Save without editing any other settings
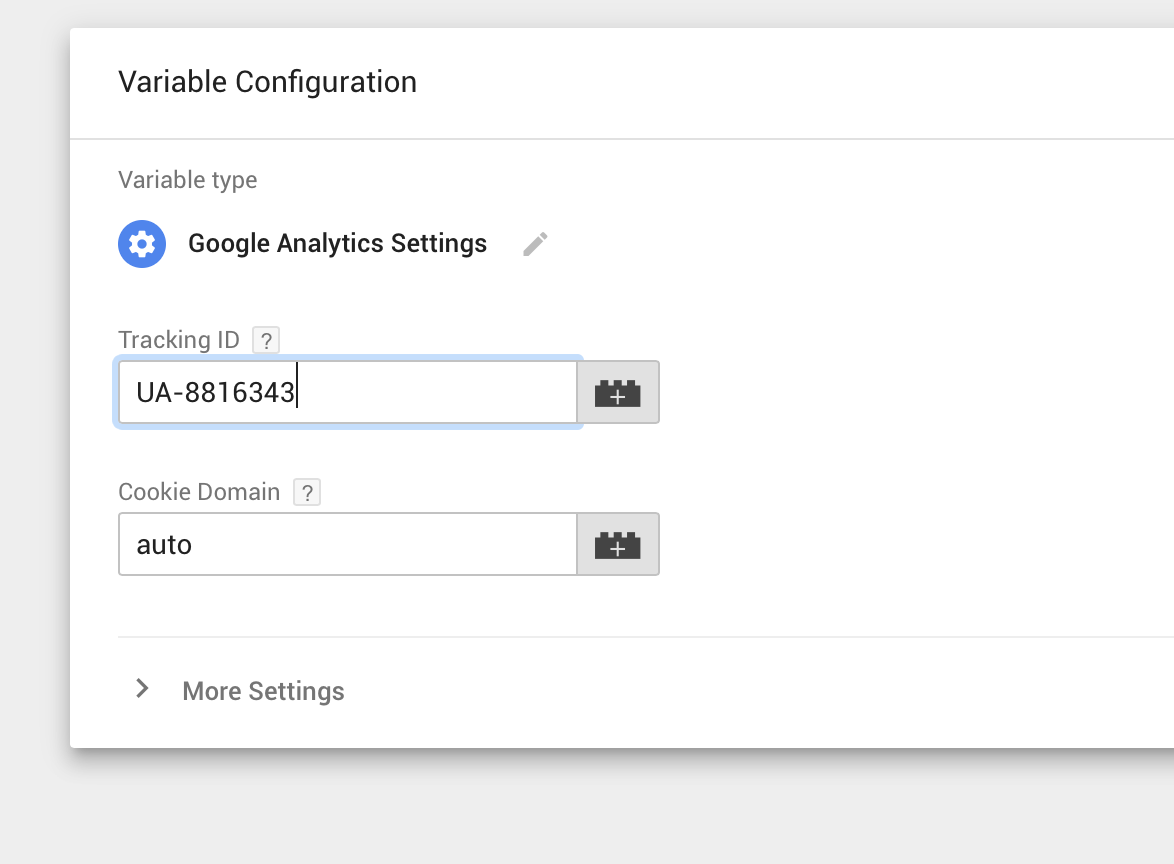
- Name the variable: "Google Analytics Tracking ID"
- Save variable
- Click on the "Triggering" box to configure the tag trigger
- Create a new trigger by clicking the "+" in the top right
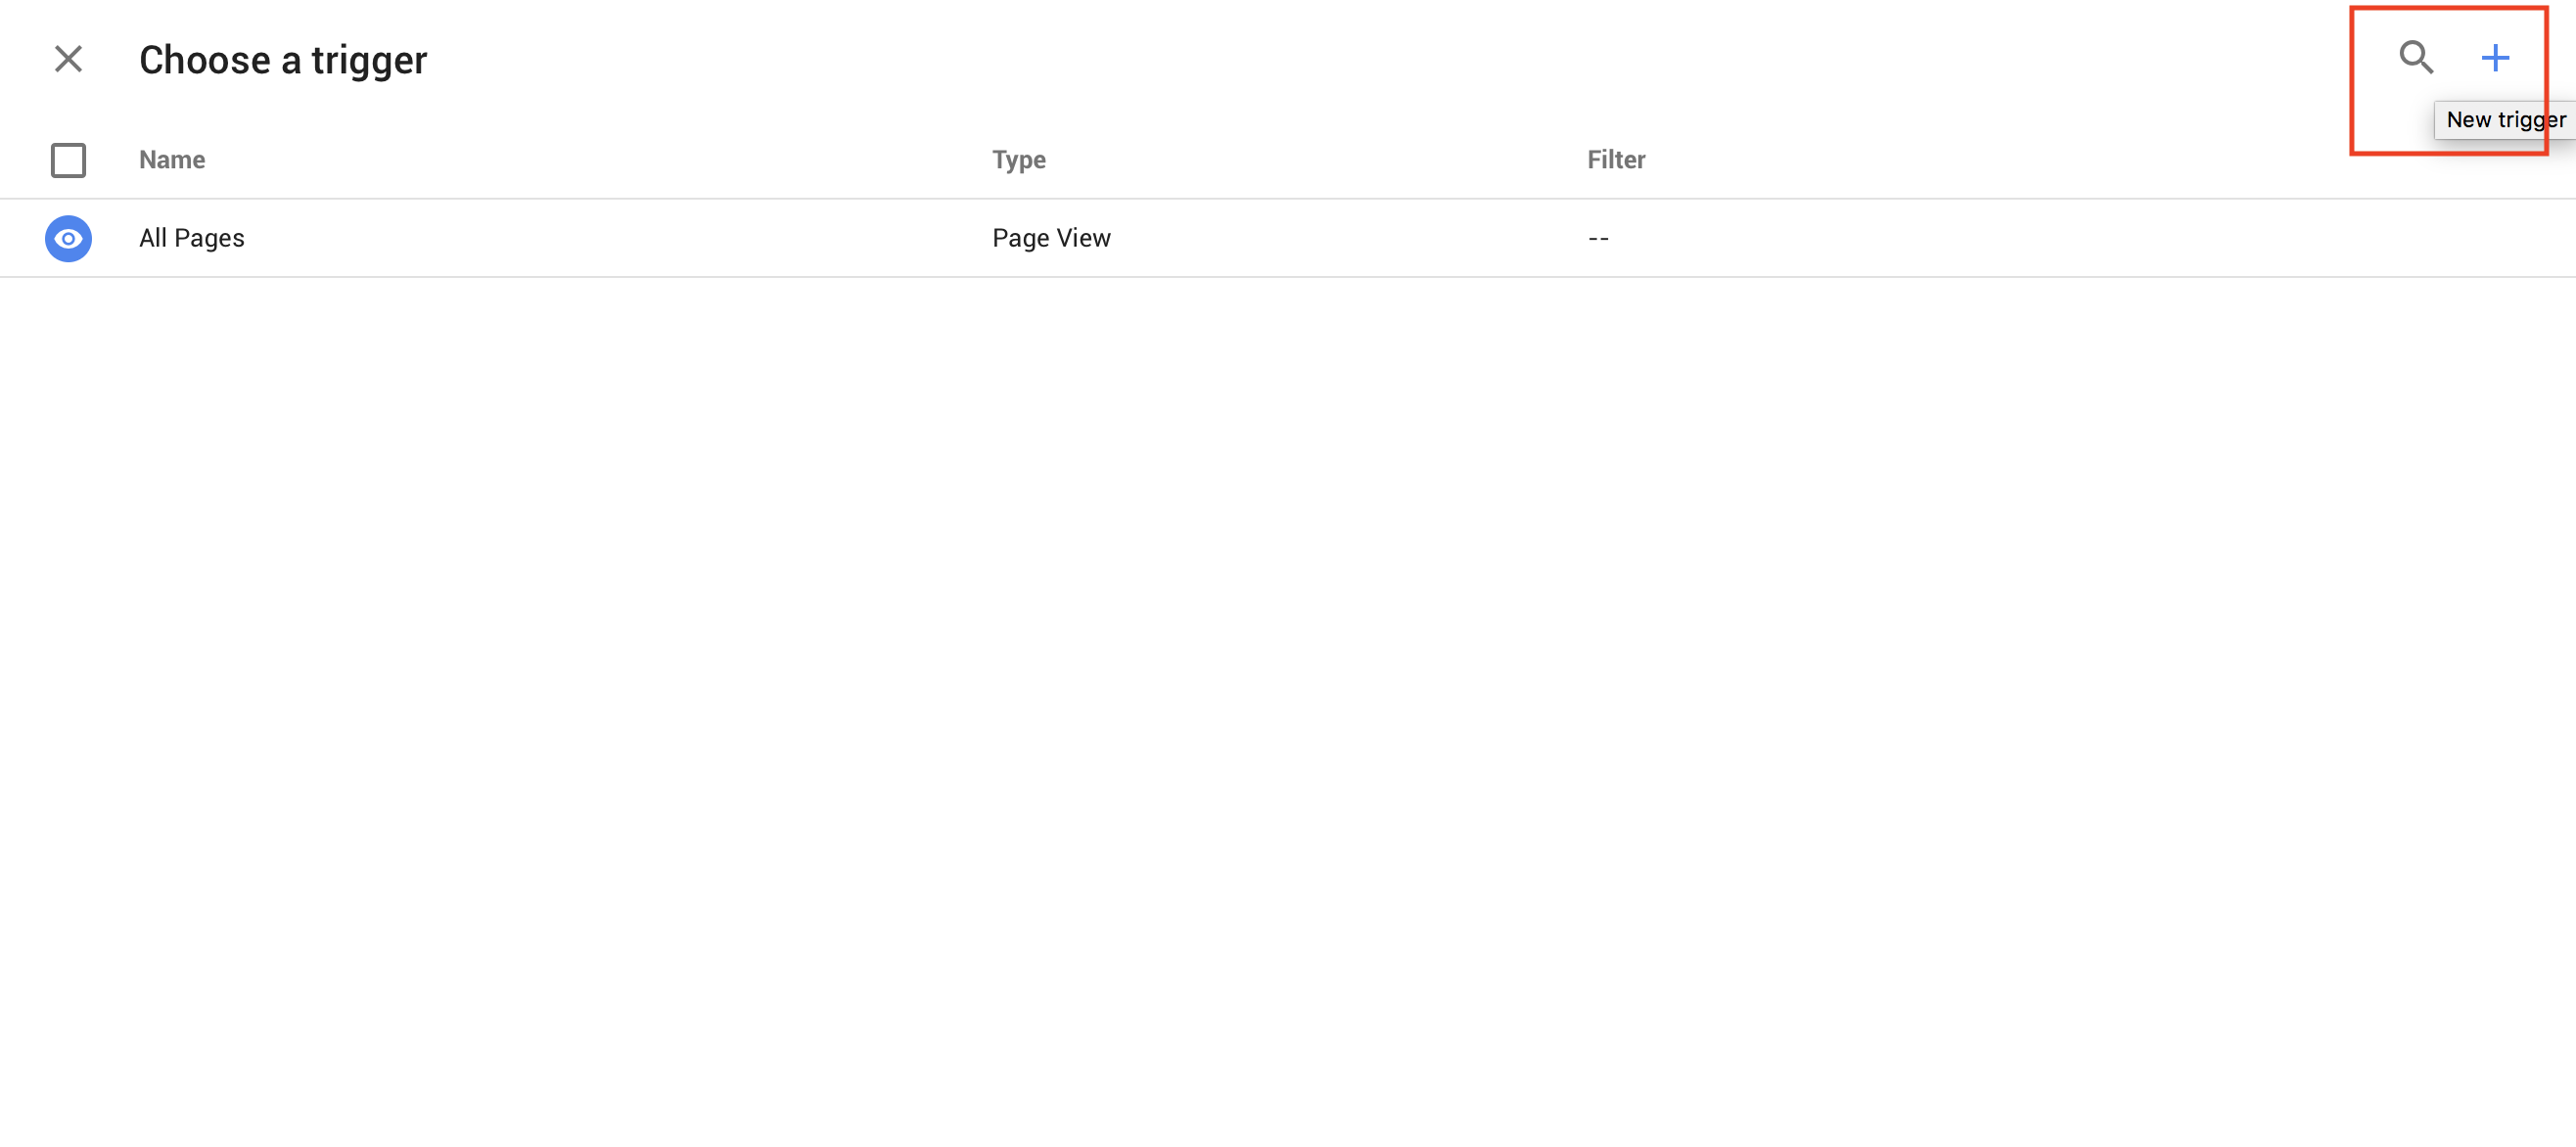
- Click on the "Trigger Configuration" box to select the trigger type
- Select the "Custom Event" trigger
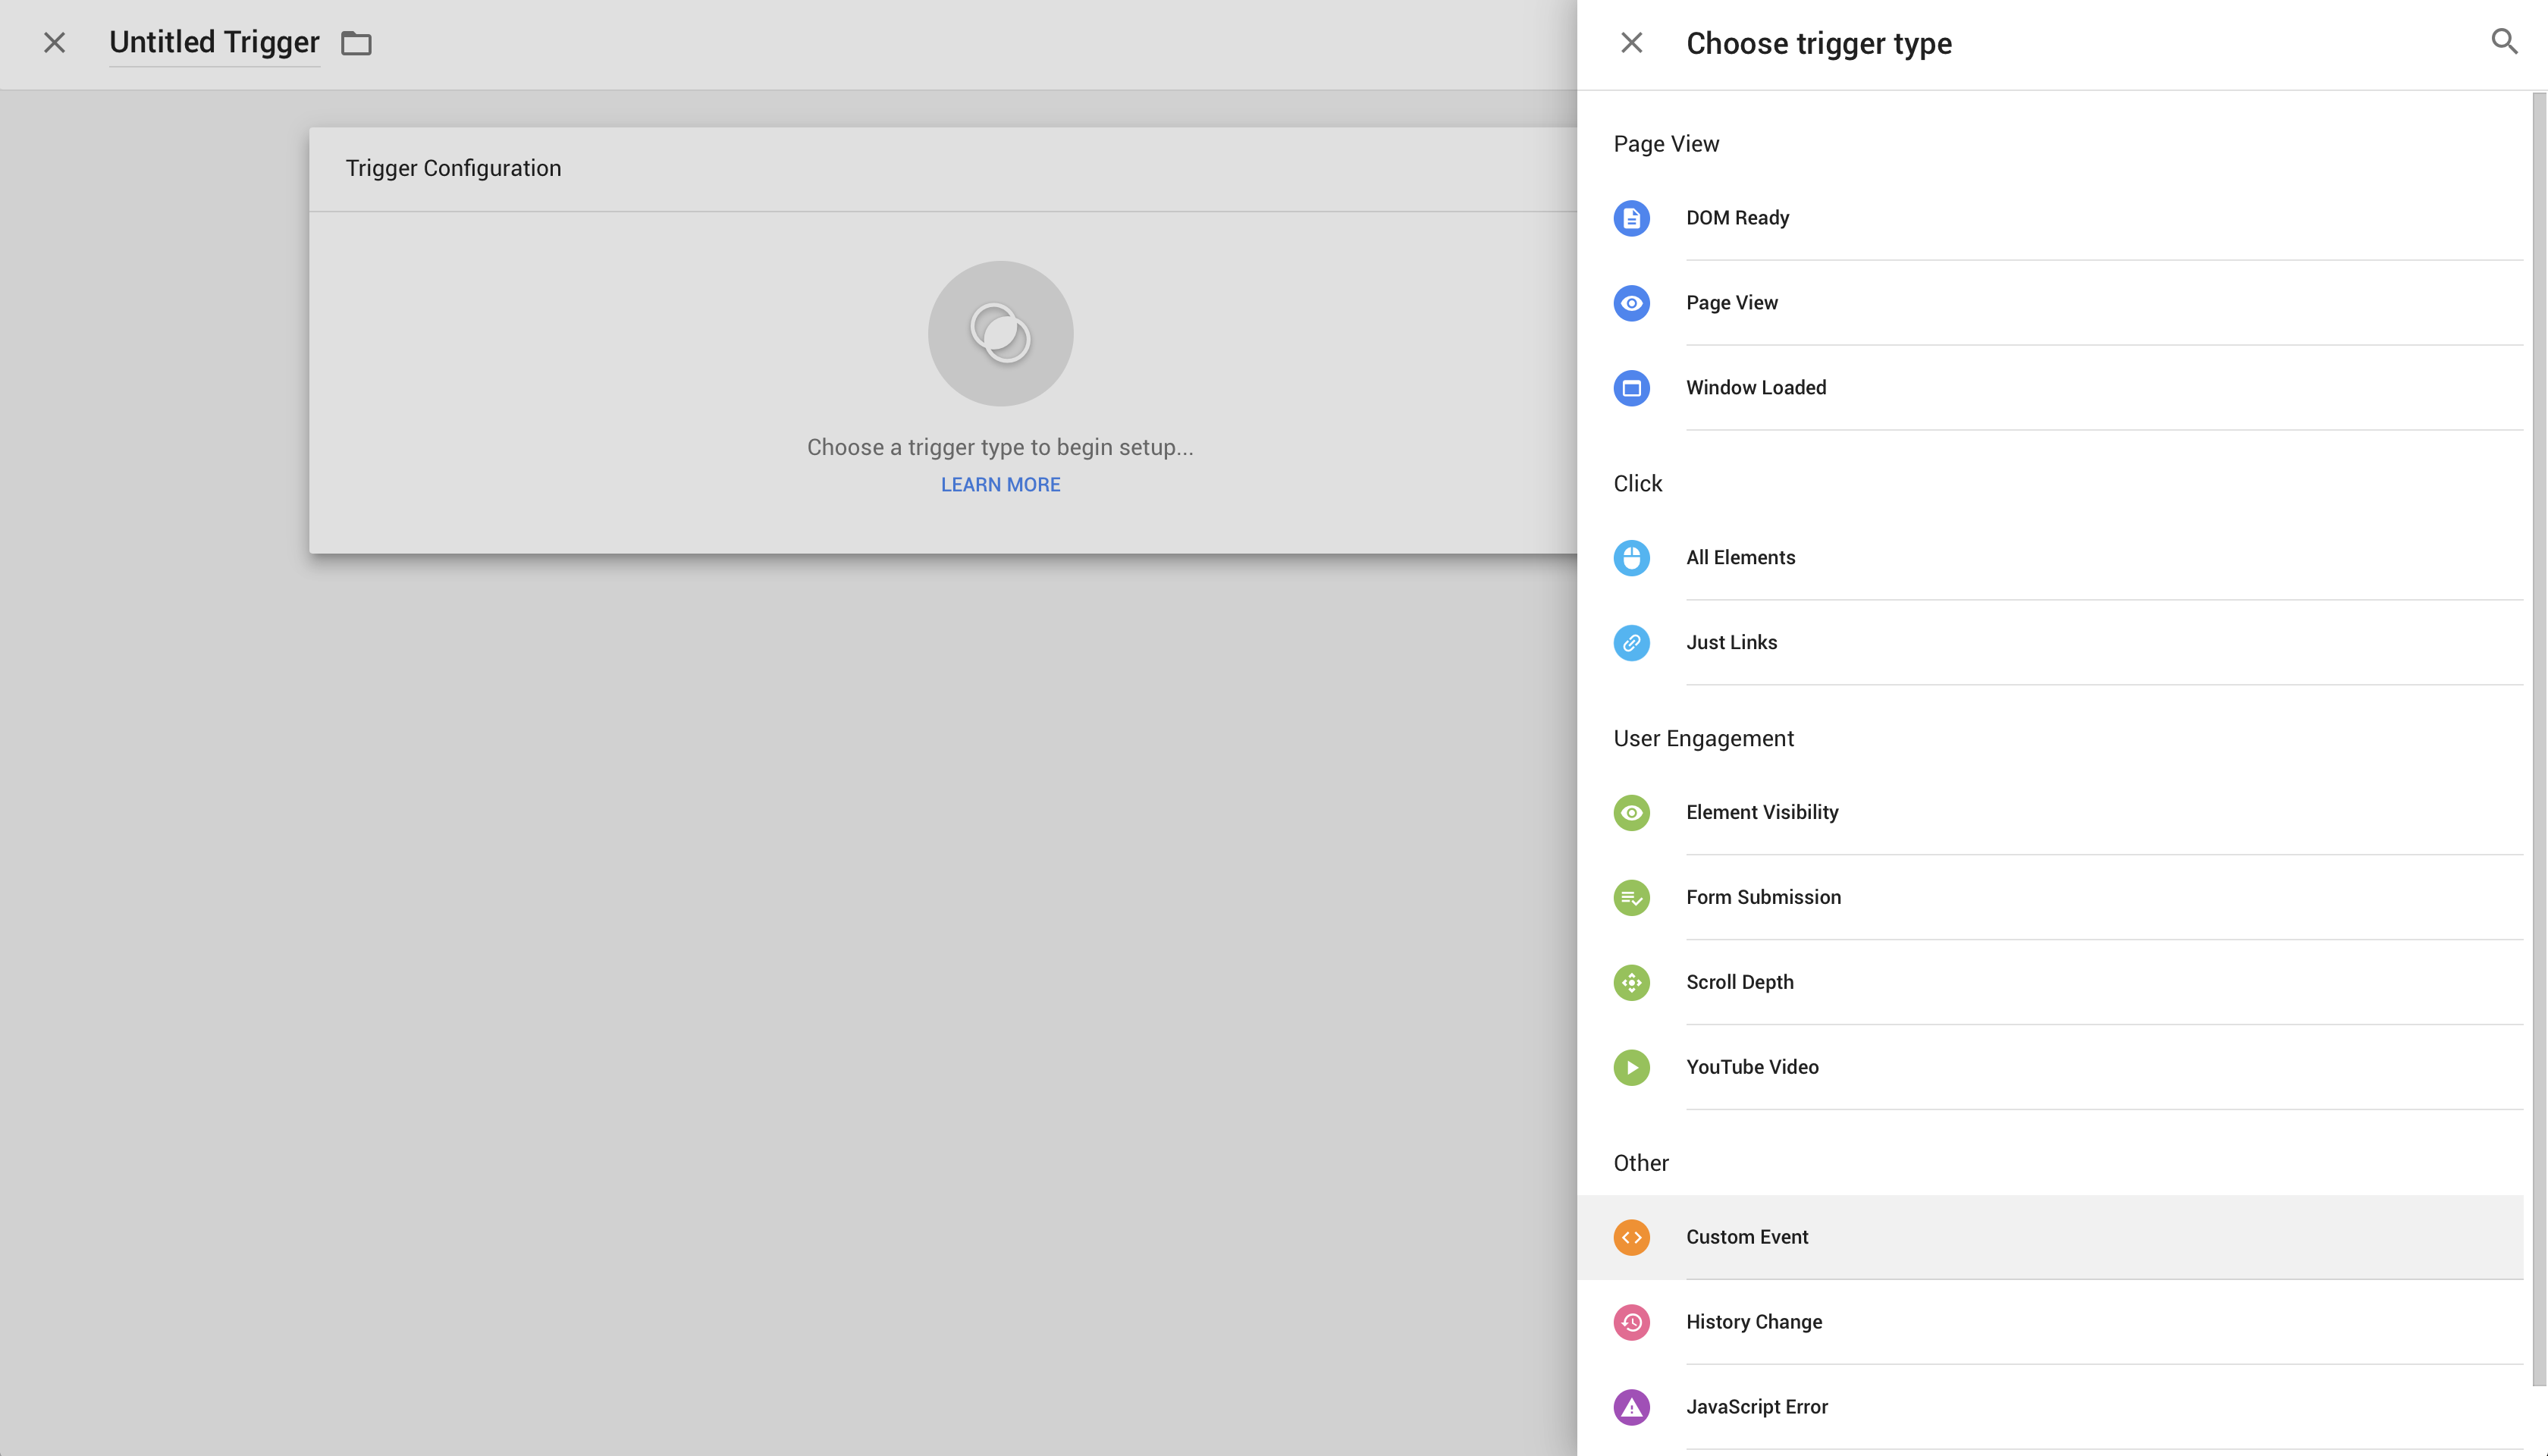
- The event name must be exactly: turbolinks:load
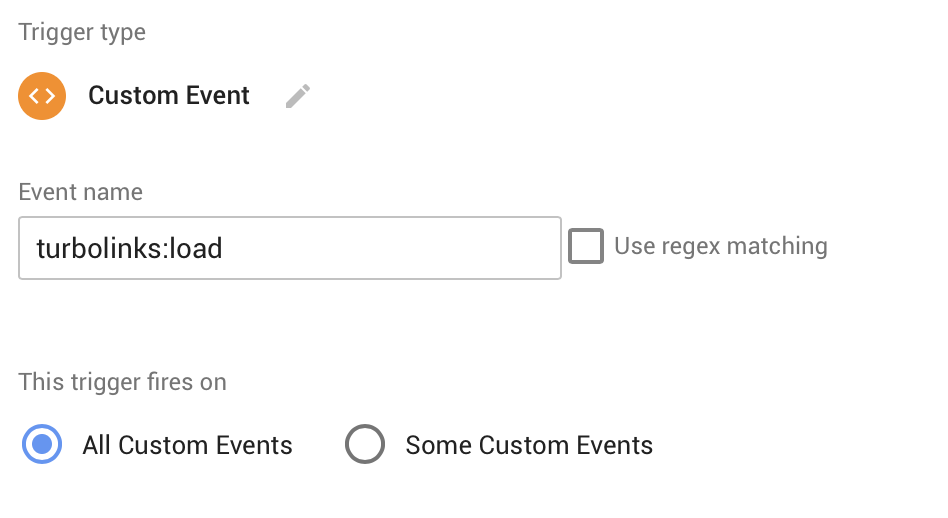
- Save without editing any other settings
- If you only want this to trigger on certain pages, you can filter by Some Custom Events and specify the page URL you would like to trigger it on.
- Name the Trigger "Turbolinks Pageview"
- Save the trigger
- To add Google Analytics E-Commerce tracking as well, follow these steps:
- Click "New" to create a new tag
- Click in the "Tag Configuration" box to select the tag type
- Select the "Google Analytics - Universal Analytics" tag type
- Select the Track Type: "Transaction"
- For the "Google Analytics Setting", select "Google Analytics Tracking ID" from the dropdown options
- Save the Tag Configuration
- Click on the "Triggering" box to configure the tag trigger
- Select the "Turbolinks Load" trigger
- Save the tag
- Name the tag: "Google Analytics - E-Commerce"
- Save
- In the top right hand corner of the Tag Manager interface, click "Submit"
- Without editing anything on the page, click "Publish" in the top right hand corner
- Without specifying any version description, click "Continue"
- Now that your tag is published, click "Admin" from the main navigation
- Copy your Tag Manager code (starting with GTM-) next to your organiser name
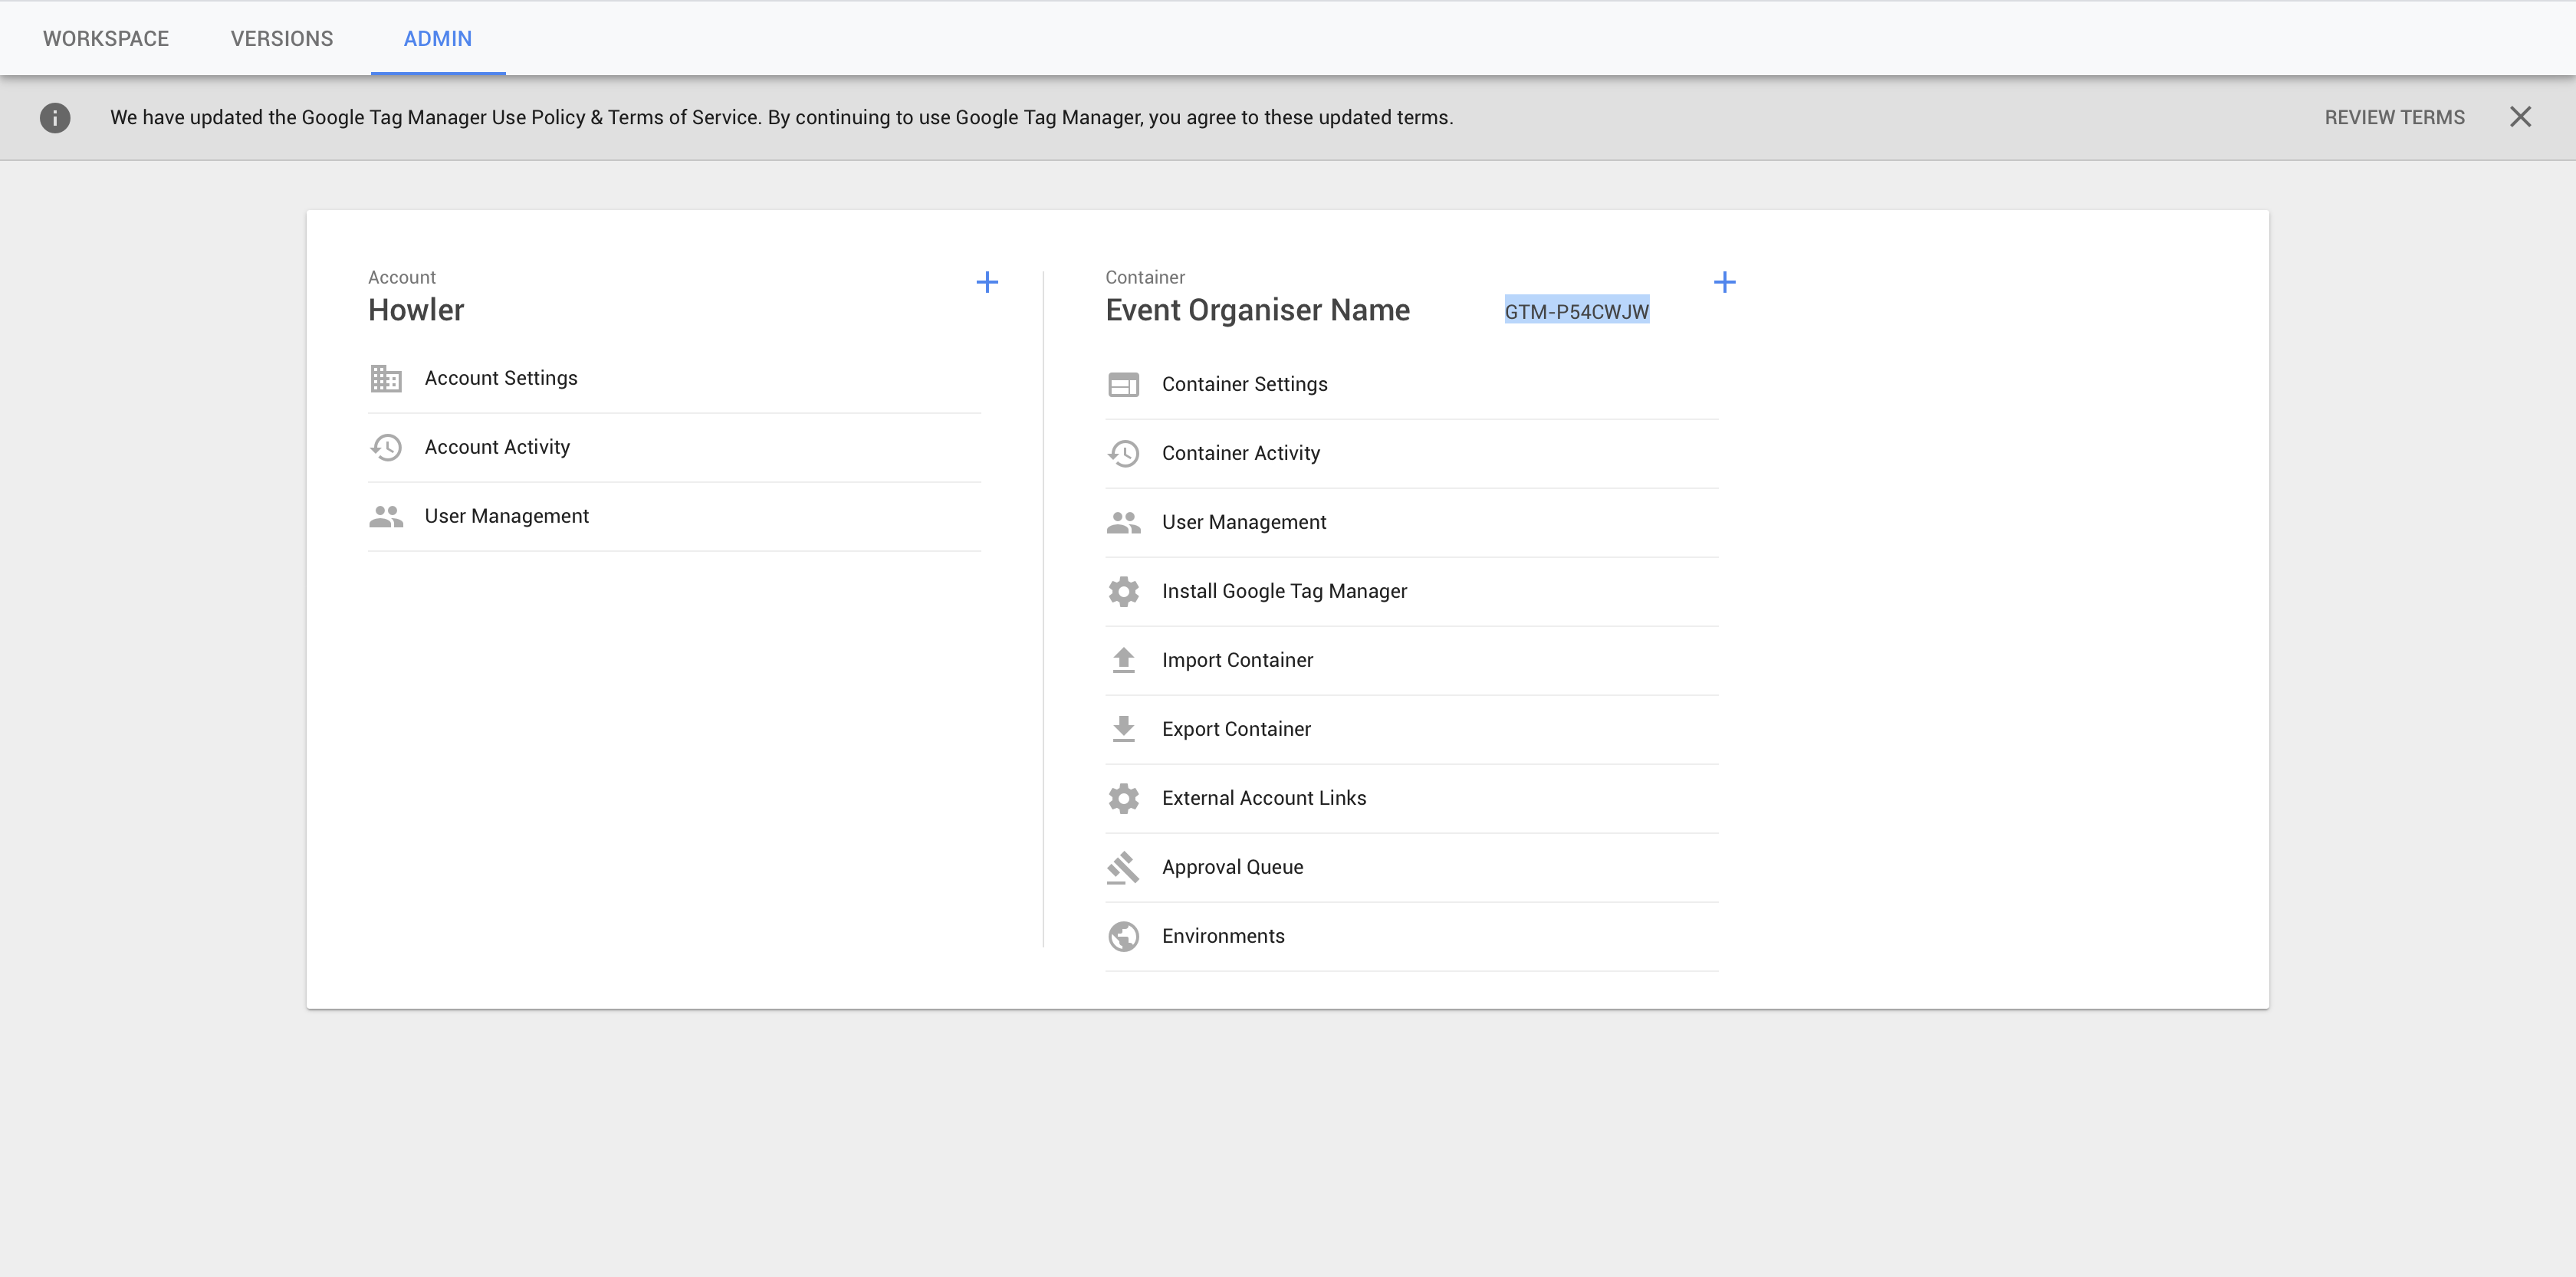
- Visit the admin portal at www.howler.co.za/admin
- Click 'Organisers' at the top of the screen
- Click 'View' on the organiser that you want to add analytics tracking to
- Click "Analytics Settings" in the top right
- Paste the Google Tag Manager code (the GTM- code)
- Save
- Wait a few minutes and your page views will start reflecting in Analytics
- If you added E-Commerce tracking, you will need to enable it in your Analytics account:
- Visit analytics.google.com
- In the Admin view within "Conversions", there is a section called "Ecommerce", here you can create conversion events.