Howler Backend Active Admin
 Updated
by Robyn Marais
Updated
by Robyn Marais
In some cases, you, the organiser will be given access to Active Admin - Our Howler Backend.
This is where you can create promo codes, add rep managers, set up a pre-registration event, and add organiser roles.
You'll receive an email invitation to the organiser profile. You'll need to click "Accept Invitation"
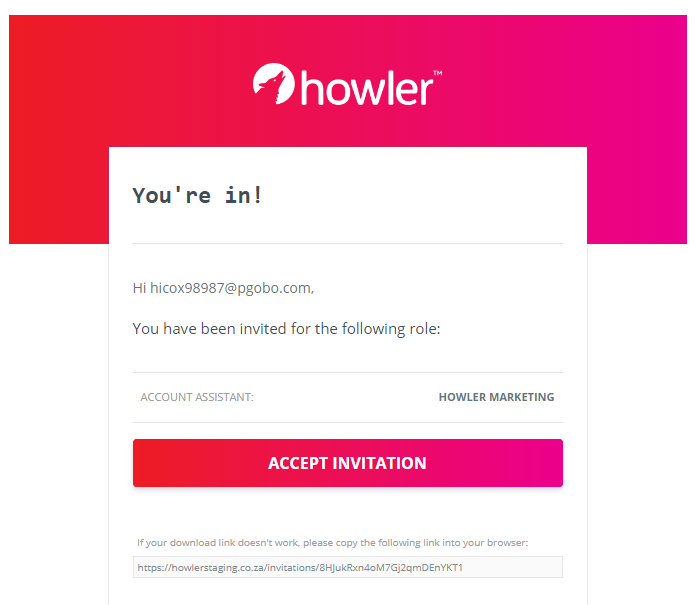
This will direct you to login/sign up to Howler. This is the same email address and password as your Howler organiser and customer profile.
You'll then be directed to howler.co.za/admin. This is the Howler Backend.
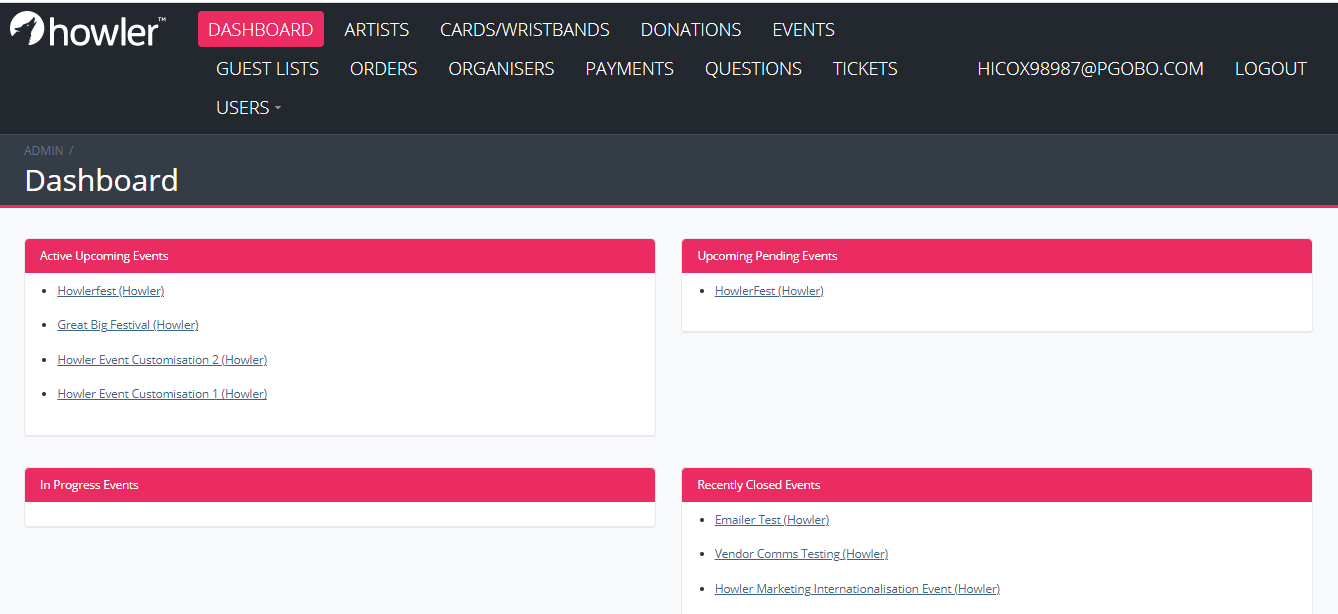
Dashboard Tabs
You'll see these tabs at the top:
Dashboard: Here you will be able to see an overview of the events you can access. It will show active upcoming events (events that are live with a date in the future), Pending upcoming events (events that are not live with a date in the future), In Progress events (events that are currently taking place) and recently closed events (events in the past).
Artists: Here you will be able to add artists and artist profile pictures. Artist information is pulled from Spotify so please be sure to keep naming consistent with Spotify.
Cards/Wristbands: Here you will be able to see the wristbands and cards used at your event. These are listed with a UID (Unique Identifier) that is a 14 digit alpha-numeric code that can be found on the back of a wristband or card. This will show the full transaction history and remaining balance of the UID.
Donations: This is where donation orders can be viewed. This will show which event the order was for, the order ID, the user, the amount and the payment status.
Events: Here you will be able to view and access all events that you have access to. All event information and actions can be done from this tab.
Guestlists: This is related to pre-registration events. Each pre-registration event will have a guestlist of customers who have pre-registered.
Orders: Here you'll be able to access all orders related to your event including the user information, payment information and order status.
Organisers: This is where you'll find the organiser profiles you have access to. This is where you can add organiser roles and manage organiser profile settings.
Payments: This is very similar to the the orders tab with some additional information. This is typically used by our finance team to manage payment issues.
Questions: This is directly related to data capture. This is where you can create and load questions that you'll add to the data capture for your event. The question needs to exist here to be allocated to your tickets.
Tickets: This tab gives you an overview of all tickets issued for your event. Including ticket types, users linked to these tickets and ticket barcodes.
Users: This tab allows you to find users linked to your event with all information linked to their profile. Including their orders, tickets, cashouts and more.
Active Admin Functionality
To see how to do the following tasks, please visit our Help Docs listed below.
How to add Rep Managers and Manage Rep
How to Setup a Pre-Registration event
How to Enable Unique Registration
How to add Data Capture Questions
Your Event
Within your event on Active Admin, you'll see the below boxes and actions available
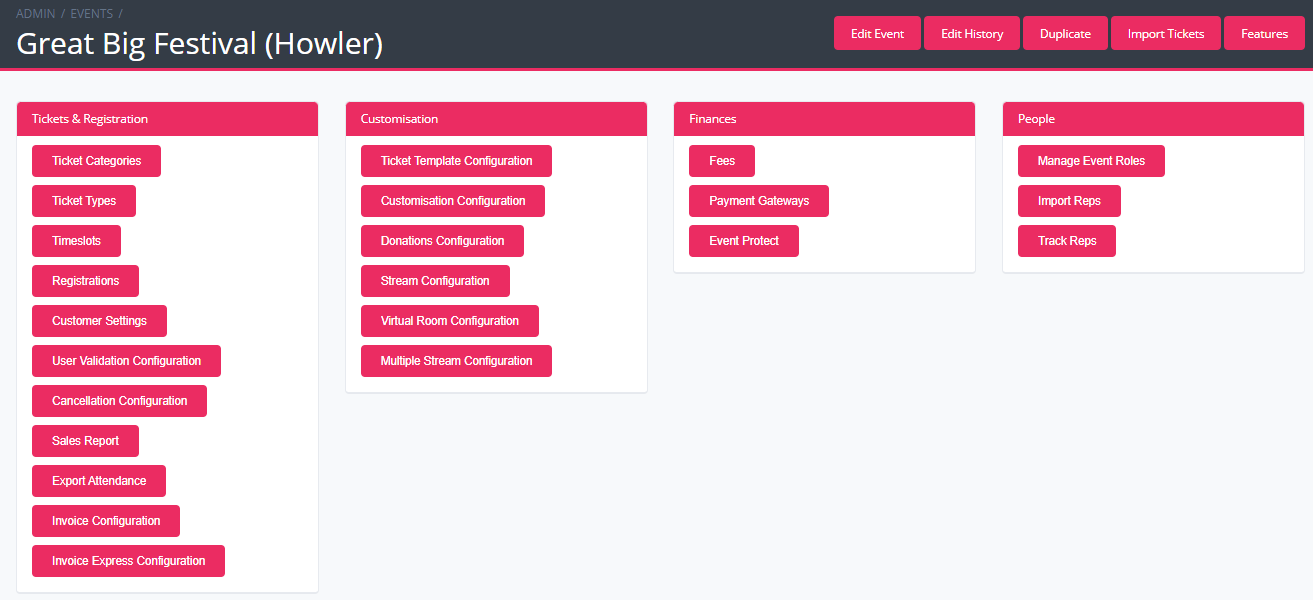
Ticketing and Registration:
Customisation: This tab is primarily used for streaming events and for large-scale customisation. Please ask your account manager for assistance with event customisation. Please note that premium customisation will incur an additional cost.
Finances: This is for internal use only. Please contact your account manager for assistance with event protect and payment gateways.
People: Here you'll be able to manage and add reps as well as additional event roles.
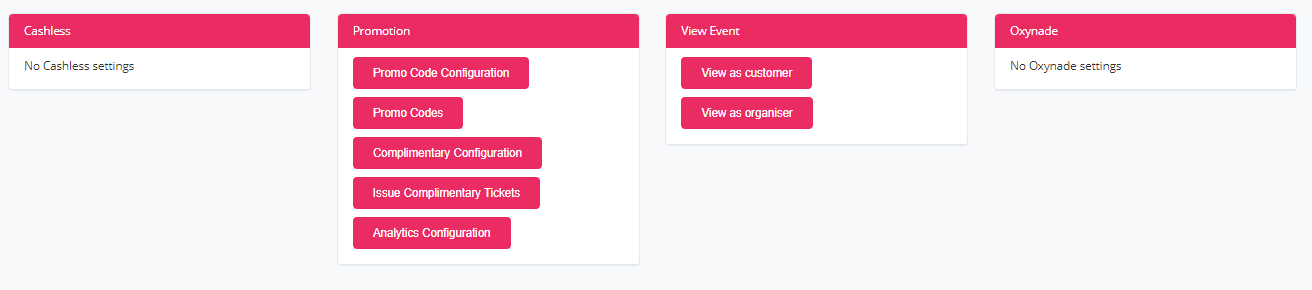
Cashless: You will not be able to take any action here. This is exclusively used internally. If your event is going cashless, you will be assigned a Client Services Manager who will take care of all of this event setup.
Promotion: This is where you will set up promo codes, issue complimentary tickets and configure your google tag manager.
View Event: Here you can view your event from different user perspectives. You can use this to "view as customer" which will redirect you to your customer facing event page where you can preview your setup. You can also use this as a shortcut to your organiser portal when you select "view as organiser".
Oxynade: You can ignore this tab as this is only relevant to old events linked to our oxynade services. This is no longer relevant but exists for specific use cases.